If you’ve ever searched for a water tank on roof GIF, you probably wanted a clear, visual way to understand how rooftop water tanks work, how water flows through the system, and why these tanks are such an important part of modern home design.
Let’s get straight to the answer first:
A water tank on the roof uses gravity to deliver water pressure throughout your home. The tank stores clean water at an elevated height so that when you open a tap or shower, the water flows naturally downward through gravity — no pump needed most of the time.
That’s why you often see rooftop tanks in both small homes and tall buildings. They’re practical, energy-efficient, and designed to keep your home’s water pressure stable all day.
Now, let’s go deeper — how these tanks work, their installation process, maintenance, benefits, and common mistakes that homeowners make when setting them up.
Why Homes Use Water Tanks on Roofs
Rooftop water tanks are one of the simplest and most reliable ways to ensure constant water supply. When placed high above, the stored water builds natural water pressure — enough to supply taps, toilets, and showers without relying on electric pumps.
In small homes, it ensures steady water even during power cuts. In larger buildings, rooftop tanks act as a reserve storage system, balancing the load from the main water line.
Globally, especially in countries like the U.S., India, Australia, and the UAE, rooftop tanks are common because they help maintain water availability even when supply fluctuates.
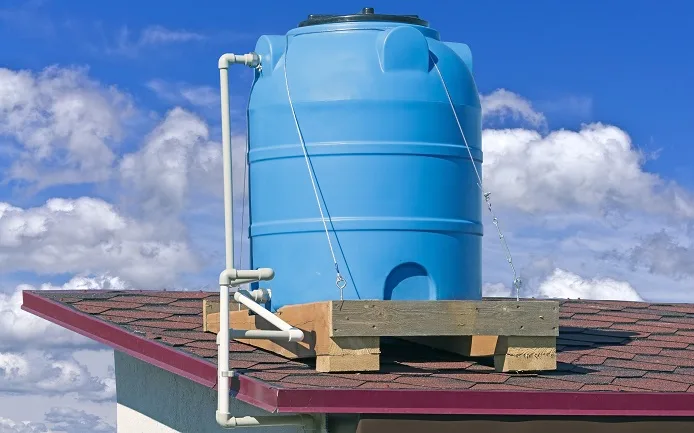
How a Rooftop Water Tank System Works
Think of a rooftop water tank as the heart of your home’s plumbing system. Here’s a simple breakdown:
- Water is pumped from the main line or underground tank up to the rooftop storage tank.
- The tank holds a fixed capacity — often between 500 to 5,000 gallons depending on your home size.
- From there, gravity creates water pressure that distributes it through pipes to every tap and appliance.
Most tanks have a ball valve or float switch that automatically stops water inflow when the tank is full. This prevents overflow and conserves water.
Modern rooftop systems also include a vent pipe, overflow outlet, and lid filter, all designed to keep the water fresh and safe from dust or insects.
Advantages of Installing a Water Tank on the Roof
Installing a water tank on the roof offers both practical and financial benefits for homeowners:
- Steady water pressure: No pump means fewer breakdowns and lower power bills.
- Backup supply: Keeps water available during supply cuts or maintenance periods.
- Energy saving: Uses gravity instead of electricity to distribute water.
- Better hygiene: Keeps water sealed and elevated, away from contamination.
- Easy maintenance: Simple structure with minimal moving parts.
Types of Water Tanks Used on Roofs
There are several types of rooftop tanks, depending on your space and climate. The most common ones include:
1. Plastic (Polyethylene) Tanks
Lightweight, corrosion-free, and ideal for homes. They resist heat and sunlight damage.
2. Stainless Steel Tanks
Durable and suitable for areas with high temperature variation. More expensive but last longer.
3. Concrete Tanks
Built directly on rooftops for larger buildings or apartment complexes. Strong but requires waterproof coating.
4. FRP (Fiberglass Reinforced Plastic) Tanks
Resistant to rust, lightweight, and used in coastal or humid regions.
Each of these options can be paired with insulation or coatings to prevent heating during hot weather.
Installation Basics of a Rooftop Water Tank
When planning your water tank on roof installation, three things matter most — position, support, and plumbing.
- Position: The tank should be placed on a flat, reinforced section of the roof to distribute weight evenly.
- Support: Large tanks often require a steel or concrete platform for extra safety.
- Plumbing: Inlet, outlet, overflow, and vent lines should be carefully aligned and sealed.
A professional plumber or certified maintenance expert can check load-bearing limits before installation, especially for tanks above 500 gallons.
Common Problems With Rooftop Tanks
Even though rooftop tanks are low-maintenance, they’re not problem-free. The most frequent issues include:
- Algae growth due to sunlight exposure.
- Sediment accumulation from dust or minerals in the water.
- Leaks or cracks caused by heat or aging.
- Uncovered lids allowing insects or birds to enter.
These can all be prevented through regular cleaning and inspection.
How to Clean a Rooftop Water Tank
Cleaning your water tank every 3–4 months is essential for hygiene. You can do it manually using simple, natural ingredients instead of chemicals.
Here’s a quick step-by-step process:
- Drain the tank completely.
- Use a soft brush to scrub the walls and base.
- Mix baking soda and white vinegar for a natural cleaning solution.
- Rinse several times with clean water.
- Leave the lid open to air-dry for 30–40 minutes before refilling.
This method removes algae, neutralizes odor, and keeps water fresh — without toxic cleaners.
You can read a full cleaning guide here:
➡️ Water Tank Cleaning Tips for Small Houses
Water Quality and Safety Standards
According to the U.S. Environmental Protection Agency (EPA), stored household water must be kept sealed, away from heat and dust, and regularly sanitized to avoid bacterial growth and contamination.
(Source: EPA Water Storage Safety Guidelines)
Following these safety steps not only protects your health but also extends the life of your water system.
Real-Life Case Study: Rooftop Tank Upgrade in Phoenix, Arizona
A family in Phoenix, Arizona, had a 300-gallon rooftop plastic tank that frequently developed algae and odor problems due to intense sunlight exposure.
Instead of replacing it, they installed an insulated cover, added a fine mesh filter on the inlet, and started cleaning with vinegar and baking soda every three months.
After six months, the results were clear — no algae, improved taste, and consistent water pressure. Their maintenance cost dropped by 40%.
This shows how simple upgrades and consistent cleaning can make rooftop water storage both eco-friendly and reliable.
Best Practices for Rooftop Water Tank Maintenance
Following these practical tips keeps your rooftop water tank in perfect shape:
- Always keep the tank lid tightly sealed.
- Clean the tank every 3–4 months.
- Install an overflow pipe directed safely away from walls.
- Avoid placing the tank in direct sunlight if possible.
- Inspect for cracks or leaks after hot summers.
These small steps ensure a constant, safe water supply and prevent future repair costs.
Mistakes to Avoid
Many homeowners make these common mistakes that can lead to tank failure or contamination:
- Ignoring small leaks that later cause roof damage.
- Using harsh chemicals for cleaning, leaving residue.
- Not checking water pressure regularly.
- Failing to install a mesh filter at the inlet.
Awareness of these issues helps extend your tank’s lifespan and keeps your water system efficient.
Environmental and Health Benefits
Rooftop tanks help reduce the strain on community water systems by storing rainwater or supplying water for later use. They are also eco-friendly since they require no additional energy source to pump water once installed properly.
Clean water from a rooftop tank also prevents diseases like diarrhea and cholera that can come from contaminated storage systems. A small maintenance effort protects both your family and the planet.
Related Articles
Conclusion
A water tank on the roof is one of the smartest and most reliable ways to ensure constant water supply and pressure in your home.
By keeping it clean, well-covered, and properly installed, you can enjoy safe, fresh water for years — without heavy maintenance or cost.
Frequently Asked Questions (FAQs)
1. Why are water tanks usually installed on roofs?
Because elevation creates natural water pressure, ensuring smooth flow through taps and showers without constant pumping.
2. How often should a rooftop tank be cleaned?
Every 3–4 months. More frequently if the water supply is dusty or if you notice odor or discoloration.
3. Can I install a water tank on the roof myself?
For small plastic tanks, yes — but larger or concrete tanks need professional assessment for load and safety.
4. How do I prevent algae in my rooftop tank?
Keep it covered, clean regularly, and avoid direct sunlight exposure.
5. What’s the ideal size of a rooftop tank for a family of four?
Typically, a 500–1,000 gallon tank is sufficient for a small family’s daily use.
Summary
Rooftop water tanks store and supply water using gravity. Regular cleaning, proper sealing, and avoiding sunlight are key for freshness. Following EPA safety tips and natural cleaning methods keeps your water pure and your system efficient.
Ethan Wells is the author of Water Tank Guides, a blog focused on practical tips for water tank cleaning, maintenance, and installation. His mission is to help readers keep their water clean, safe, and their tanks long-lasting through simple, easy-to-follow guides.